Baseboards and trim play a crucial role in enhancing the aesthetic appeal of any home or commercial space. They provide a finished look to the walls while also offering protection against damage. Whether you are renovating your home or working on new construction, proper baseboard and trim installation can significantly elevate the overall appearance of your space. In Houston, TX, MY Handyman provides expert baseboard and trim installation services, ensuring precision, durability, and elegance in every project. This comprehensive guide will walk you through the process of installing baseboards and trim, offering insights into materials, tools, and best practices.
Why Baseboards and Trim Matter
Before diving into the installation process, it is important to understand why baseboards and trim are essential for your home:
- Aesthetic Appeal – They add a decorative element to walls and floors, creating a seamless transition between surfaces.
- Protection – Baseboards shield walls from scuff marks, furniture scratches, and moisture.
- Increased Home Value – Well-installed trim work can boost the value of your property by enhancing its interior design.
- Conceal Imperfections – They help hide uneven flooring, gaps, and rough edges where walls meet floors.
Tools and Materials Needed for Baseboard Installation
Before starting your baseboard installation project, gather all necessary tools and materials. If you’re creating baseboards from scratch, Tom Silva suggests a base at least 6 inches high and 1/2-inch to 3/4-inch thick, topped with a separate, deeply profiled cap molding.
Essential Tools for Installing Baseboards
- Block plane
- Caulking gun
- Compass or scribe tool
- Compound miter saw
- Level (4-foot recommended)
- Nail gun or hammer
- Nail set
- Pencil
- Sandpaper (fine grit)
- Stud finder
- Tape measure
Required Materials To Install
- Baseboards (measure your room and add 10% for waste)
- Caulk
- Finish nails (8d and 4d)
- Paint or stain (if finishing baseboards after installation)
- Painter’s tape
- Wood filler
- Wood glue
The Process of Installing Baseboards and Trim: Step-by-Step Guide
- Setting the Baseboard Height
Using a 4-foot level, find the top of your floor. Your guide for keeping a constant height across the room will be this. Mark this height on the wall and then draw a level line around the outside of the room. This line will direct the top edge of your baseboards such that they remain level even if the floor is not.
- Attaching Baseboards to the Wall
You have to find the studs before fastening baseboards to the wall. Mark wall stud sites with a stud finder. Driven at a small downward angle close to the top and bottom borders of the board, use 8d finish nails when mounting baseboards. Driven the nail heads just below the wood surface, a nail set will help to produce a cleaner finish. This attachment style offers a strong hold and, should future removal be necessary, simplicity.
- Dealing with Corners
For inside corners, just butt the baseboard ends together and nail them to the wall. Outside corners call more for grace. Die the ends of each piece at 45 degrees to make sure they fit closely. Reversing the connection using wood glue and biscuit joints will provide further strength. To guarantee a great fit, remember to dry-fit every piece before final installation.
4. Attaching the Baseboards and Trim
Once all pieces are cut, it’s time to install them:
- Apply Adhesive – For added security, apply construction adhesive to the back of the baseboards before nailing them in place.
- Position the Baseboard – Align the baseboard against the wall, ensuring it is level.
- Secure with Nails – Use a nail gun or hammer to attach the baseboard to the wall, ensuring nails are driven into studs.
- Repeat for Trim – If you are installing crown molding or other trim, follow the same process.
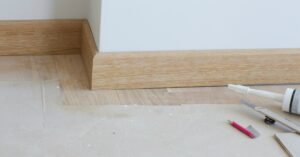
5. Filling Gaps and Finishing Touches
For a polished look, follow these final steps:
- Fill Nail Holes – Use wood filler or putty to fill nail holes and gaps.
- Caulk Seams – Apply caulk along seams where the baseboard meets the wall to create a seamless look.
- Sand and Smooth – Lightly sand the baseboards and trim to remove rough edges.
- Paint or Stain – Apply paint or stain to match your interior design.
Why Choose MY Handyman for Baseboard and Trim Installation in Houston, TX?
In terms of baseboard and trim installation, accuracy and experience count. Professionally installed with meticulous attention to detail, MY Handyman in Houston, Texas guarantees perfect outcomes. Our crew uses premium materials to ensure longevity and is adept in handling several kinds of trim and molding.
Benefits of Choosing MY Handyman:
- Skilled Craftsmanship – Our team is trained in precise cutting, fitting, and finishing techniques.
- Customized Solutions – We offer tailored options to match your style and home’s design.
- Timely Service – We complete projects efficiently without compromising quality.
- Affordable Pricing – Get high-quality service at competitive rates.
Conclusion
A polished and sophisticated interior depends on first laying baseboards and trim. Following the correct installation technique guarantees lifetime and aesthetic appeal whether you are building new construction or updating an existing house. MY Handyman is here to assist you should you require expert advice and live in Houston, Texas. Get in touch right now to arrange your baseboard and trim installation service!